
Overview
Goal: To selectively Run Certain Data Driven Permutations as part of a data driven test run
Jenkins Plugin You’ll Need:
- https://plugins.jenkins.io/text-file-operations
- https://wiki.jenkins.io/display/JENKINS/Matrix+Combinations+Plugin
Objective: configure a Jenkins automated test execution job so that we can selectively run certain test permutations for a particular test.
The assumption here is that you have one test and that this test can be run multiple times with different data sets. What we want to do is have one Jenkins job that is dedicated to running one automated test. However, that one test can be driven with data and can be run many times with these different data sets.
In this example then we’ll simulate our test case as a command line call to complete a calculation from a Windows command prompt (other flavours of command prompts are available but aren’t covered here).
REM this build step simulates our test
REM in the real world it would be….
REM a call to run a test case externally
set /a 2*2

What is Jenkins and How to Install Jenkins
Checking Test System Environment Before Starting Your Tests
Test Automation Execution based on App Version Updates
Re-running A Failed Automated Test Automatically With Jenkins
Running Data Driven Tests with the Matrix Project Plugin
We’re just using this to simulate a test case in this example. In the real world this could be a call to a Selenium test or a LeapWork test.
What’s unique though is that this test case is data driven. This data driven component could be in the form of a CSV file with lots of permutations. Those permutations including test input values and the expected results. In our example we’ll use the following:
input_A, input_B, expected_result
2,2,4
2,3,6
2,4,8
2,
In the real world this data is likely to be contained in a source code repository or a database. Either way one test is repeated many times, each time using 1 permutation from the data set.
What We’re Aiming for
We’re aiming to split up test runs into more manageable run chunks. Essentially if you have a group of similar tests that are either data driven or driven by some sort of configurable parameter then you can get Jenkins to run the test multiple times with the different data/parameters.
If you run the test multiple times then this will of course create multiple test result records. We’ll see how Jenkins provides one overall test result value but also allows you to drill down and look at all the individual tests.
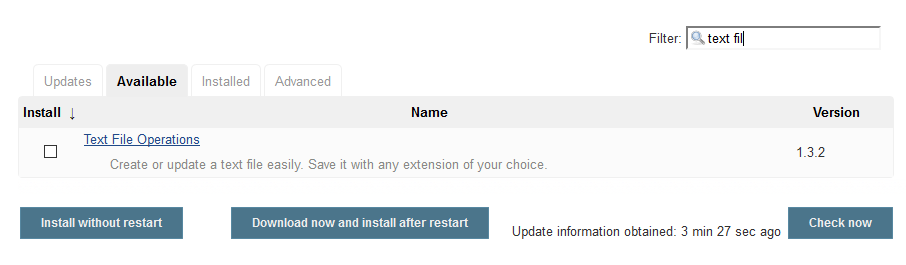
Text File Operations
Matrix Configuration Parameter
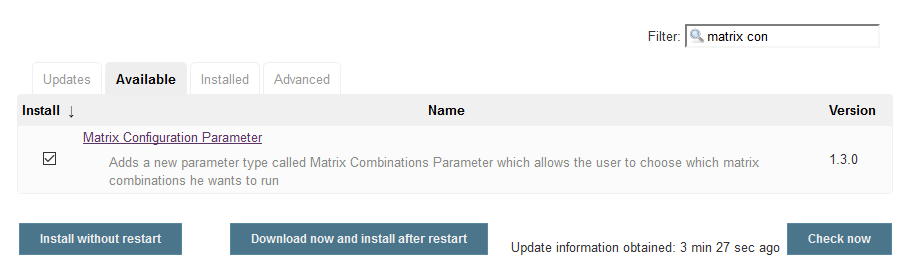
All of this depends on the Conditional Build Step plugin. First we need to install this plugin. From your Jenkins Manage Plugins page find the ‘Conditional Build Step’ plugin along with any dependencies
You’ll want to find these two plugins (names have evolved a little):
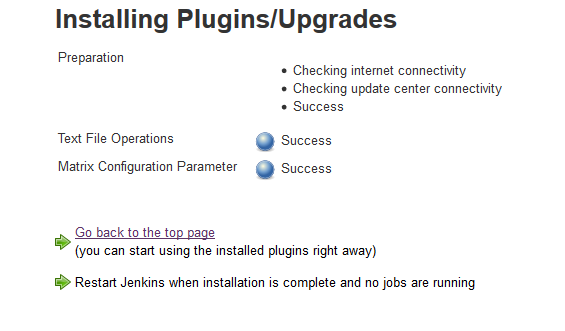
Simplest way to install them is just select them on the Plugin Manager page under the ‘Available’ tab then click the ‘Install without restart’
Or you can download the latest .hpi file using the link below and install it manually in your instance of Jenkins
- https://updates.jenkins-ci.org/download/plugins/text-file-operations/
- https://updates.jenkins-ci.org/download/plugins/matrix-project/
Note that we’re only installing the Text File Operations plugin because we want to use this in our example below to create a data file for our tests.
First we need to create a new Multi-configuration Project. Click on ‘New Item’ link on the Jenkins home page
And then select the ‘Multi-configuration Project’ option. Provide a name for your job and click the Ok button

Then we need to make sure we ‘Parameterise’ this build.
Next we’re going to add a few build steps to simulate a data driven test and create another build step that produces that data. You should be aware that these build steps will be replaced with steps that actually call YOUR tests. We’re building these just to demonstrate the principals here.
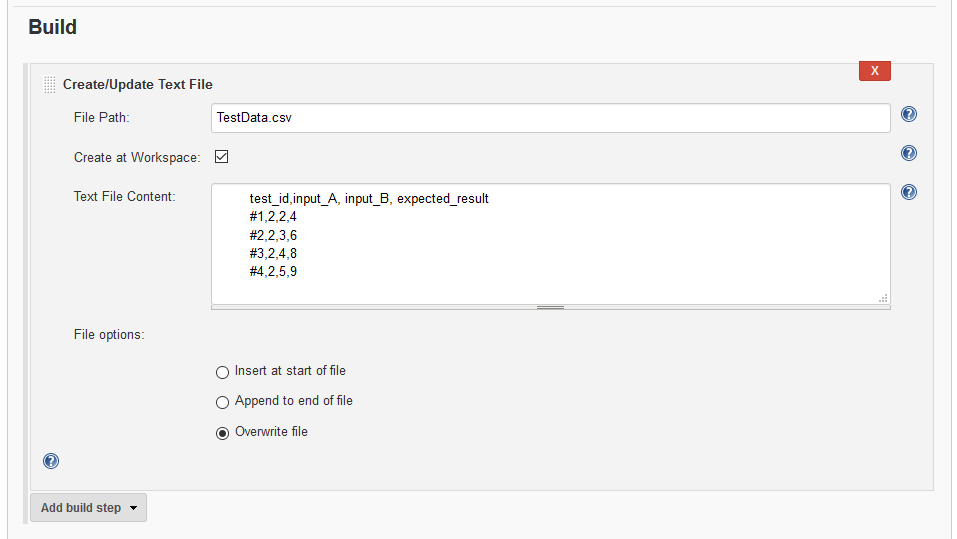
Add the first build step ‘Create/Update Text File‘. Enter the file name ‘TestData.csv‘, set ‘Create at workspace‘ to True, Overwrite for file options and enter the following for the content:
test_id,input_A, input_B, expected_result
#1,2,2,4
#2,2,3,6
#3,2,4,8
#4,2,5,9
You should end up with a build step that looks like this:
All we’re doing here is creating a CSV file that contains a few data permutations. Each permutation identified by a unique tag or test_id (for example #1). We have two input values and an expected output value. NOTE that the final data permutation, #4, is designed to fail (the expected result is incorrect).
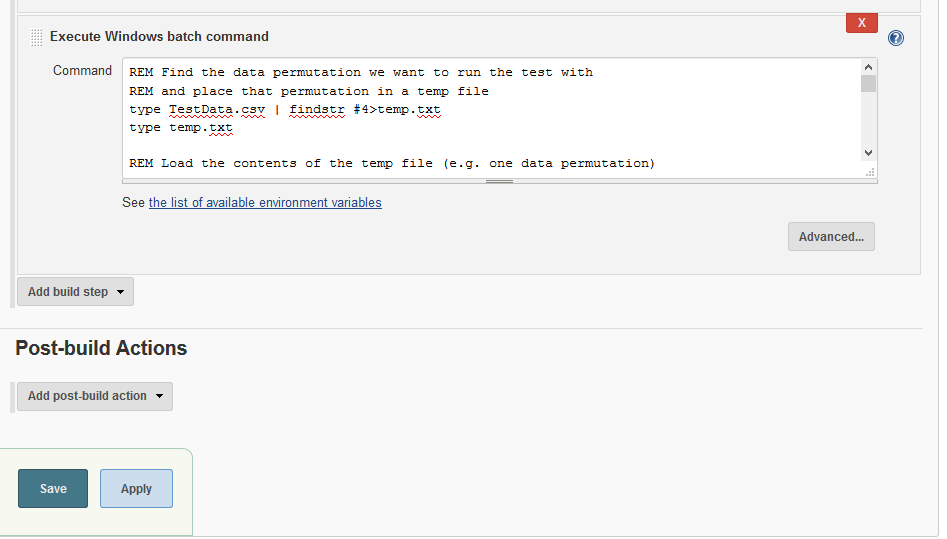
Add the second build step ‘Execute Windows batch command‘. Enter the following batch commands
REM Find the data permutation we want to run the test with
REM and place that permutation in a temp file
type TestData.csv | findstr #4>temp.txt
type temp.txt
REM Load the contents of the temp file (e.g. one data permutation)
REM into a variable called PERMUTATION
set /p PERMUTATION=<temp.txt
echo %PERMUTATION%
REM Split the value out from the PERMUTATION variable into
REM separate variables (this is very crude and wont scale!)
set INPUT_A=%PERMUTATION:~3,+1%
set INPUT_B=%PERMUTATION:~5,+1%
set EXPECTED_RESULT=%PERMUTATION:~7%
REM Write our test conditions and expected results out to the console
echo INPUT_A is %INPUT_A%
echo INPUT_B is %INPUT_B%
echo EXPECTED_RESULT is %EXPECTED_RESULT%
REM Run the test and save the result in the Result variable
REM Also write the result to the concole
set /A Result = %INPUT_A% * %INPUT_B%
echo %Result%
REM Test to see if the result matches the expected result
REM Then write the test result value to the console
if %Result% == %EXPECTED_RESULT% set res_name=PASS
if NOT %Result% == %EXPECTED_RESULT% set res_name=FAIL
echo %res_name%
REM if test passed then exit with return code 0 (pass)
REM if test failed then exit with return code 1 (fail)
if “%res_name%” == “PASS” exit /b 0
if “%res_name%” == “FAIL” exit /b 1</temp.txt
You can read through the comments in the script to get an understanding of exactly what is happening. In short though we’re taking one data permutation and running the following test:
%INPUT_A% * %INPUT_B%
Then we check the result against our EXPECTED_RESULT value. Depending on the result we exit from the batch commend with either a=0 or a=1. If it’s 0 Jenkins takes this as a pass. If it’s 1 Jenkins takes this as a fail, and sets the build result value appropriately.
We can actually run this now before we’ve created the Matrix conditions in the Jenkins job. Click save and then ‘Build Now‘
You should see this fail.
Go back into the job and change this line in the ‘Execute Windows batch command’ build step:
type TestData.csv | findstr #4>temp.txt
to
type TestData.csv | findstr #1>temp.txt
Instead of having the test hard coded to run perumutation #4 now we’ll run with #1. #1 has the correct expected result. So when you run again the next time (save the job and click ‘Build Now’ the job should Pass.
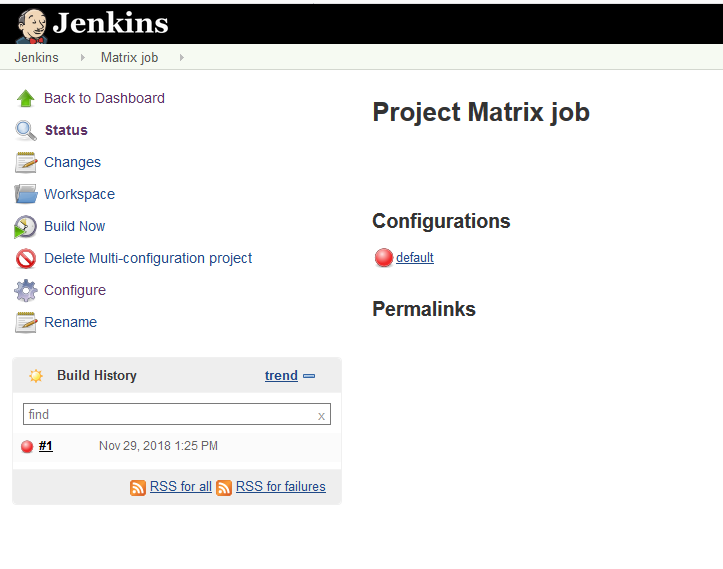
Now we’ve check the default job we’re ready to configure the Matrix part of the job. The part of the job that will run all 4 permutations and record individual results for each data permutation we run the test with.
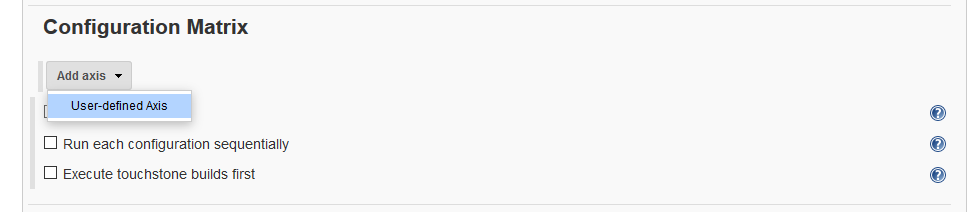
‘Configure‘ the job and in the ‘Configuration Matrix‘ section select ‘User-defined Axis‘.
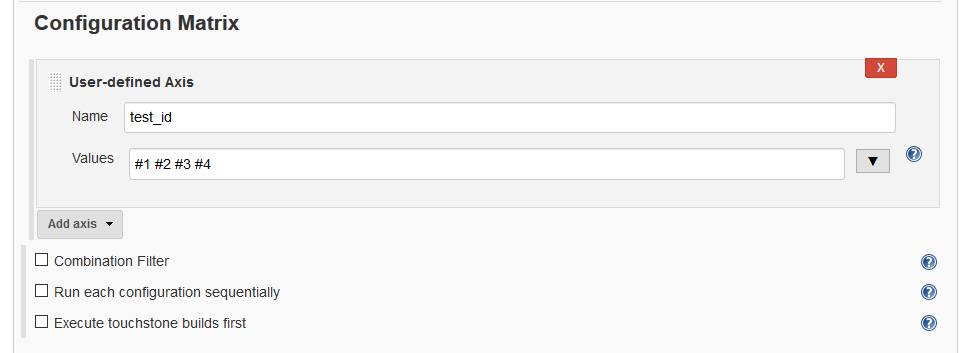
Give the name as ‘test_id‘. Then enter all the test id values in the values text box as follows:
Only one thing left to do. In our ‘Windows batch command‘ build step, where we run the actual test, we need to update it with our test_id variable. In the ‘Execute Windows batch command’ then, modify this line again,
type TestData.csv | findstr #1>temp.txt
to
type TestData.csv | findstr %test_id%>temp.txt
Now what Jenkins will do is, for every value of test_id defined in the Configuration Matrix section (e.g. #1, #2, #3 and #4) repeat the execution of this Job replacing the %test_id% value with the different test id values. Thus we repeat the test four times, each time with the different csv data row values.
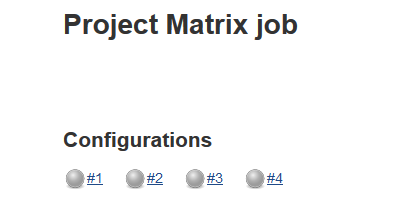
Save the job and you should see each of the configurations listed:
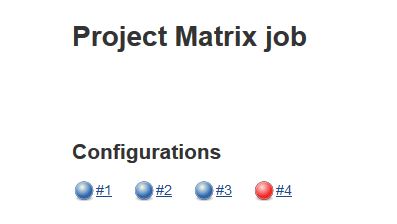
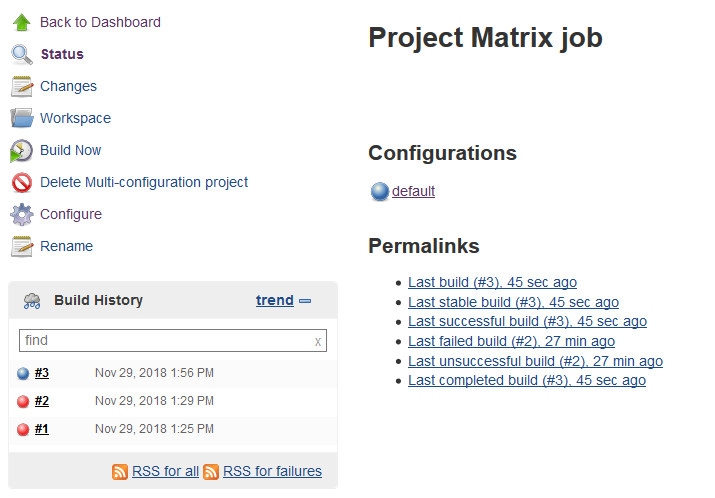
Now click the ‘Build Now‘ button to run the tests. You should see your overall build history increment by 1 and a list of the pass/fail results for all the permutations
And hey presto we’ve run the same job 4 times, each time with a different data permutation. You have an overall test run result (the overall job/build/run result) and you have individual test results for each permutations. You can drill down into each of these individual test permutation runs by clicking on the test_id value.
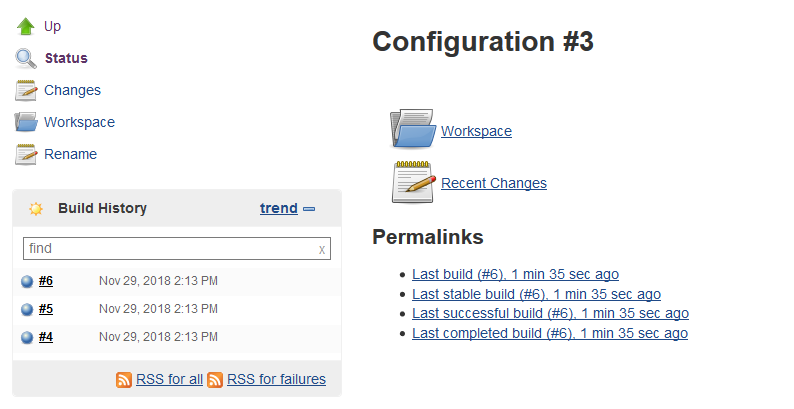
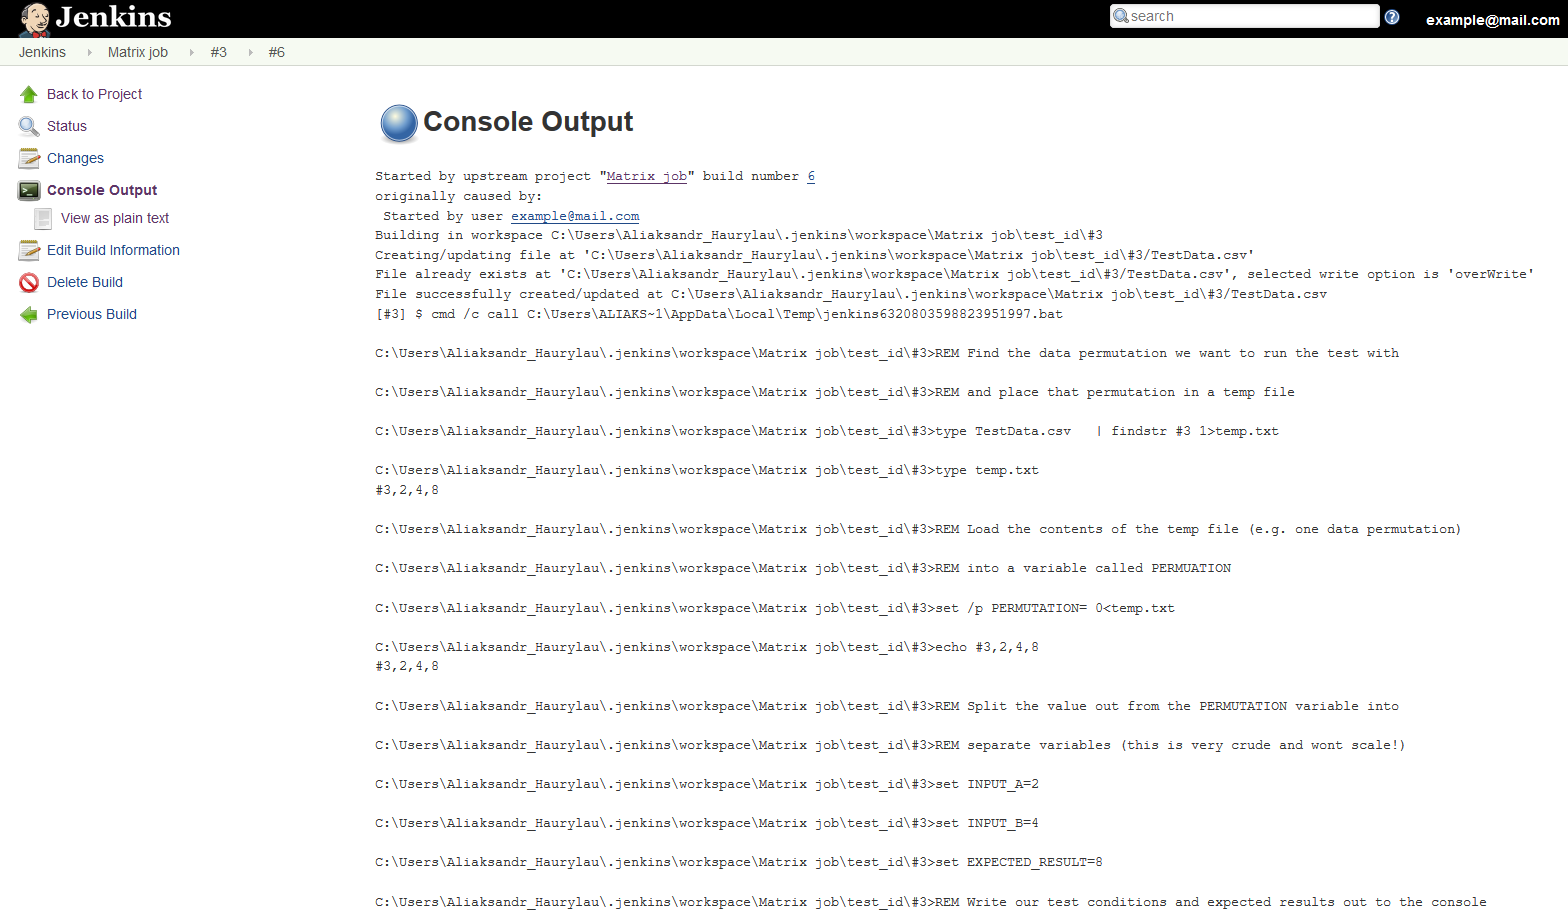
And then on the individual permutation page you can drill into the console view and see exactly what happened with this test run instance…
Summary
Whilst this is a pretty simple example it’s not difficult to build this out with more complex tests with larger data sets. You can even build out the matrix to have multiple matrix values thus developing quite a clever why of testing with many data values. Taken a step further you could go as far as having many Jenkins client machines and run the different matrix combinations across a pool of different machines so that you’re running all the tests in parallel. It’s not difficult to build this out and scale things up once you’ve grasped the concept of defining the Matrix combinations and making sure you feed those values in to the build steps that call your tests.